


ramiro.araujo
-
Posts
84 -
Joined
-
Last visited
-
Days Won
6
Content Type
Blogs
Gallery
Downloads
Events
Profiles
Forums
Articles
Media Demo
Posts posted by ramiro.araujo
-
-
for the record, I completely deleted Alfred, removed all associated files, re launched the app from scratch, powerpack, sync, and now everything works fine

-
Hi!
I've been using PathFinder for a while, but just decided to stop using it in favor of the standard Finder + xtraFinder. PathFinder set's itself a the default Finder app so that other apps can reveal files in PathFinder, among other things.
I disabled this feature before removing PathFinder, but now Alfred can't reveal in Finder while all other apps do just fine. If I return the PathFinder app to it's place, then Alfred _can_ reveal, but in PathFinder, while all other apps still reveal in Finder. Only if I turn the "set a default finder" feature back on everybody reveals in PathFinder.
Any hint or help is appreciated!
Cheers
-
Yay! I've rebuilt this workflow from scratch! I now uses bundled binaries from all the different optimization libraries, all orchestrated by the image_optim library, which is great, since it now longer depends on having ImageOptim, ImageAlpha and more importantly JPEGmini installed! I'll update packal when possible, but right now you can check it out and download it from github: https://github.com/ramiroaraujo/alfred-image-optim-workflow
-
Switch System Ruby Workflow for Alfred App
A simple Ruby development workflow for Mavericks to switch system Ruby between 2.0.0 and 1.8.7.
My use case is specifically for Alfred workflows development, since Alfred uses the system Ruby, and not the binaries from RVM or rbenv. It might come handy in similar situations where system Ruby is needed.
Usage
Type the switchruby keyword to see the menu option:
The only actionable option is the first, which will switch between Ruby 2.0.0 and Ruby 1.8.7. The workflow will ask por Administration Privileges to continue.
Installation
Download the alfred-switch-ruby.alfredworkflow and import to Alfred 2.
Changelog- 2014-02-07 - Released
-
Type Clipboard Workflow for Alfred App
Simple workflow to write the clipboard content in those situations where ⌘ → V doesn't work, typically in non Cocoa application dialogs. It has happened to me in older Flash versions, Intellij IDEA and a few others. You have to go and paste with right clicking the mouse or pad... Atrocious!!
Setup
After installing the workflow you have to setup the default keyboard shortcut, since Alfred does not auto-import keyboard shortcuts on workflows. I use ⇧⌃⌥⌘ → V, since I don't use it that often.
Alternatively, you can trigger the typing with the typeclipboard keyword.
Usage
Just trigger the shortcut or keyword to type the clipboard content. There's a character cap of 500 characters, to avoid accidents, since the typing takes time depending on the length of the text. If you hit the cap, you'll hear a classic error sound.
Installation
Download the alfred-type-clipboard.alfredworkflow and import to Alfred 2.Source Code
Clone or Fork the Workflow: https://github.com/ramiroaraujo/alfred-type-clipboard-workflow
Changelog- 2014-02-04 - Released
-
Set Resolution Workflow for Alfred App
Handy workflow to change between available screen resolutions, even between normal and HiDPI mode (Retina).
It allows you to list and search available resolutions for each connected display, and action the result to do the change. The change persists between logout (ex: restart, shutdown, etc).
It filter's out duplicated resolutions where a retina resolution is available, for example, if you have available 1280x960 in both retina and non-retina, you'll only see the retina option; no need to set the pixelated one.
Usage
Type the keyword setresolution to show a list of resolutions. You'll see that the first result is actually a non-actionable result which shows the current resolution.
If you have more than one display, you'll see instead the displays to select, and by actioning on any display the workflow will reload with the display index and after the keyword, and ready to search/select the proper resolutions. When using multiple displays, the display index is needed, but you can write it down yourself to make it faster, like setresolution 1 1280 to search for 1280 on display index 1 (the second from the list)
You can also type after the space to search for resolutions (searches the numbers).
The available resolutions list is usually quite large. You can delete available resolutions from the list by actioning the result while holding the ⌥ (alt) key.
If you connect a different display, or want to undo a deleted resolution you need to reset the list by actioning the keyword resetresolution
Installation
For OS X 10.9 Mavericks, Download the alfred-set-resolution.alfredworkflow and import to Alfred 2.
For Previous OS X Versions, Download the alfred-set-resolution.alfredworkflow and import to Alfred 2.Source Code
Clone or Fork the Workflow: https://github.com/ramiroaraujo/alfred-set-resolution-workflow
Credits
Build around a modified version (my fork) of a fork of Robbert Klarenbeek's ResolutionMenu app, by Anthony Dervish.
Changelog- 2014-02-24 - Released
-
Tmux Workflow for Alfred app
Alfred workflow to manage tmux sessions, integrated with iTerm2. It can list current sessions, connect to them, kill them or create a new one. The connect or create action actually opens iTerm2 and connects to the session. Additionally, in all the open actions (new session or connect to session) it can cd to the current Finder's or Path Finder's directory.
Please note: the workflow only handles tmux sessions. It doesn't handle windows, panes, or any other tmux command.
Dependencies- iTerm2 installed
- tmux installed in /usr/local/bin/tmux; easily installed with homebrew doing brew install tmux
Usage
Write the tmux keyword in Alfred to trigger the workflow.
The initial menu options are:- An initial not actionable menu item indicating to keep writing after the keyword to search/filter or create a new session.
- Option to connect to a default tmux session. It's a session named "default" that will always appear in the menu, and if it doesn't exists it will be automatically created.
You can start typing right away after the keyword for search or create a session, or optionally add a space after the keyword for readability; the space is ignored. You'll see the filtered results (bash/zsh included), and a last option to created a new tmux session with the entered name, if non existent.


If you want to kill a session, action it with ⌥ down. If failure, for example trying to kill the bash/zsh option, you'll hear a classic error sound.
If you want to open the current Finder's or Path Finder's folder, action the current or new session with ⌘down. This command is very fast for new tmux sessions but adds a delay of 1 second for existent tmux sessions, since I cannot find a way to wait for tmux session to load, except by waiting long enough. Still, opening current Finder's path in already existing sessions shouldn't be that common.
Installation
For OS X 10.9 Mavericks, Download the alfred-tmux.alfredworkflow and import to Alfred 2.
For Previous OS X Versions, Download the alfred-tmux.alfredworkflow and import to Alfred 2.Source Code
Clone or Fork the Workflow: https://github.com/ramiroaraujo/alfred-tmux-workflow
Changelog- 2014-02-05 - Released
-
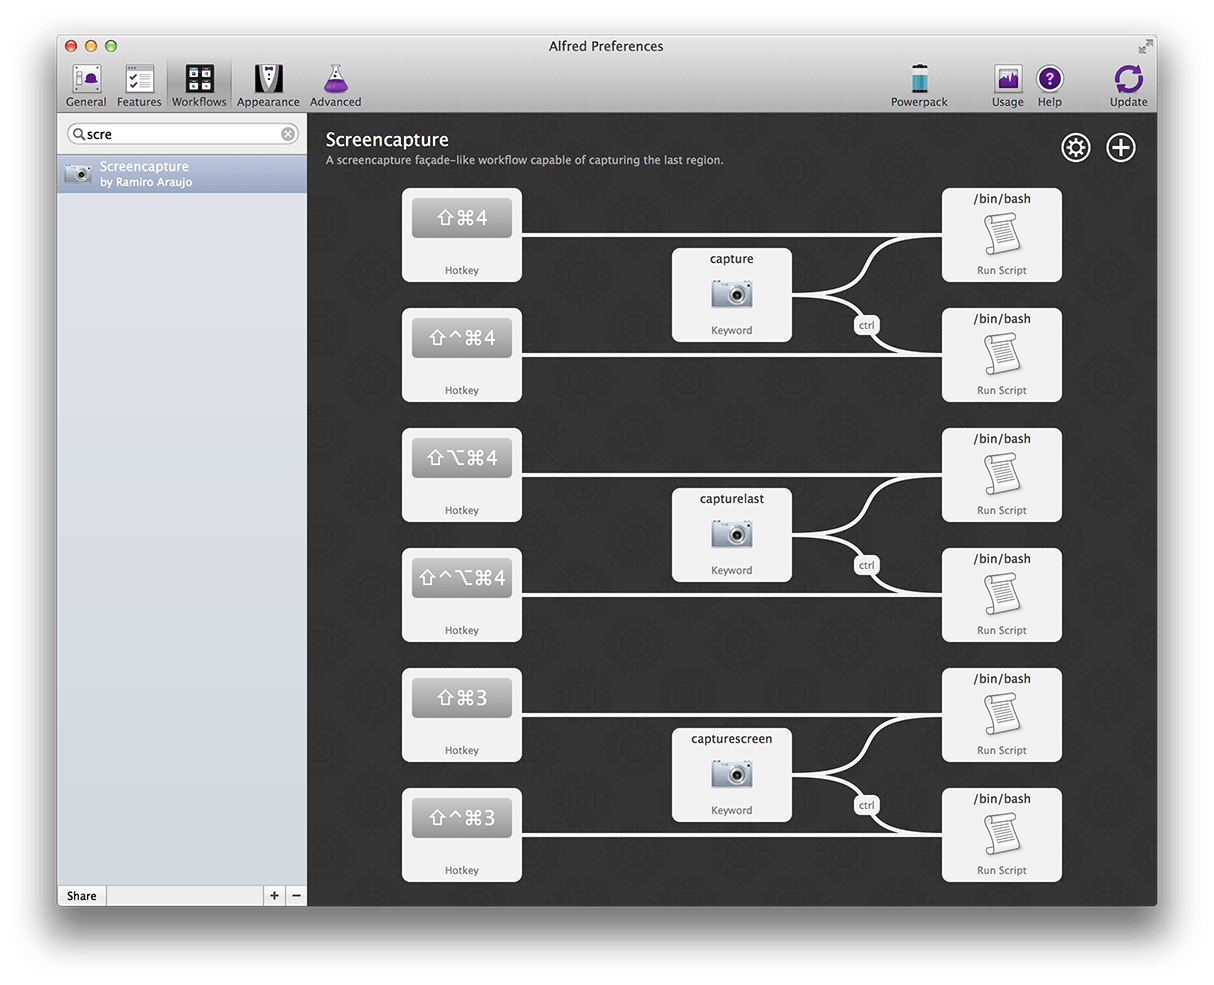
Screencapture enhancer for Alfred App
Workflow to enhance OS X screencapture capabilities, particularly with the option to capture last captured area and naming options.
The screencapture app that ships with OS X is quite Ok, but I've always missed being able to keep capturing the same previously captured region, for example for taking screenshots of different pages, where you define a region by taking the first screenshot, and then keep taking new ones in different pages.
This workflow allows this by disabling the original OS X shortcuts and implementing the same shortcuts within the workflow. There're same caveats to install, basically manually removing the original shortcuts and manually adding the same ones to the workflow, since installing workflows does not allow you to import the defined shortcuts (see below).
In the area mode the workflow performs a normal area screenshot, and at the same time runs a custom made cli app in Objective-C that listen for mouse and keyboard events and saves the proper screen coordinates for later use. It also circumvents a few bugs from the cli screenshot app.
Additionally, the workflow works by keywords. The keywords way has the advantage of allowing to specify a custom name for the screenshot, instead of the default one.
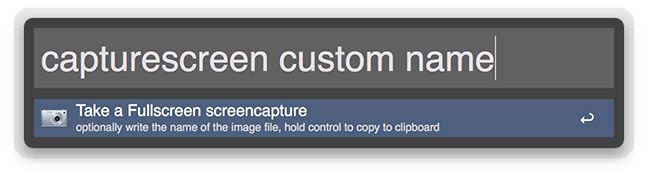
Usage- ⌘+⇧+3 to take a full screen capture, or write the keyword capturescreen and optionally specify a filename.
- ⌘+⌃+⇧+3 to save a full screen capture to the clipboard, or write the keyword capturescreen and action it while holding control.
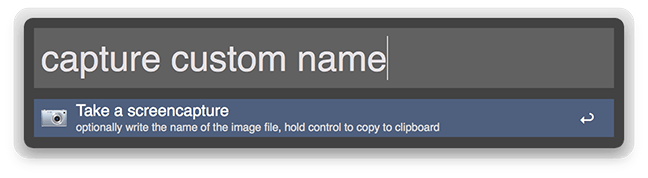
- ⌘+⇧+4 to take an area screen capture interactively, or write the keyword capture and optionally specify a filename.
- ⌘+⌃+⇧+4 to save an area screen capture interactively to the clipboard, or write the keyword captureand action it while holding control.
- ⌘+⇧+⌥+4 to take a screen capture of the previously used area, or write the keyword capturelast and optionally specify a filename.
- ⌘+⇧+⌥+⌃+4 to save a screen capture of the previously used area to the clipboard, or write the keyword capturelast and action it while holding control.
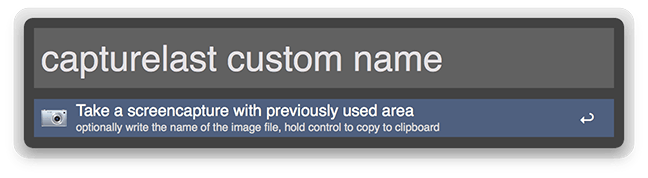
As shown in all examples, the keyword version is capable of specifying a name for the captured image.
InstallationFor OS X 10.9 Mavericks, Download the alfred-screencapture-enhancer.alfredworkflow and import to Alfred 2.
For Previous OS X Versions, Download the alfred-screencapture-enhancer.alfredworkflow and import to Alfred 2.First, go to System Preferences -> Keyboard, there to the Shortcuts tab, select Screenshots in the left list and uncheck all the shortcuts on the right, as shown below.
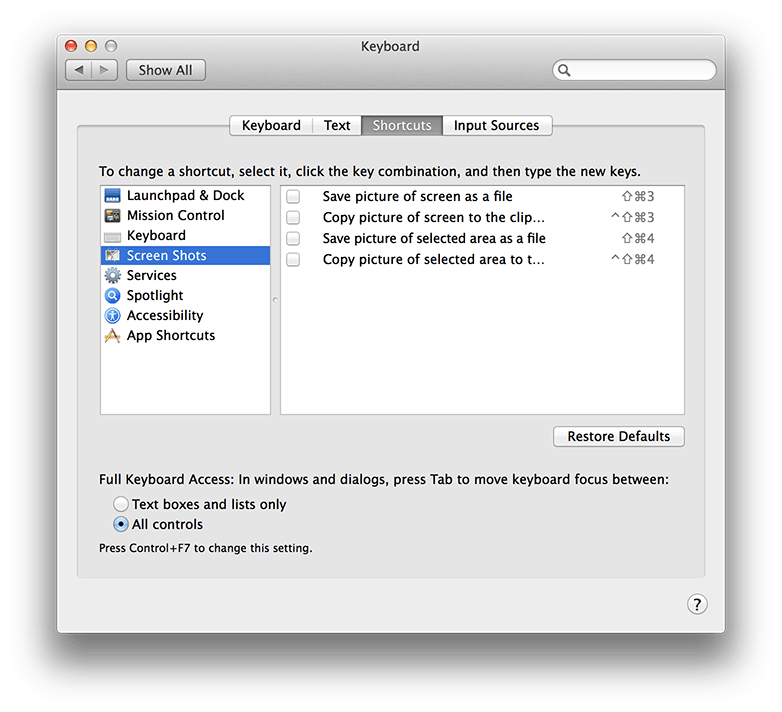
Then install the workflow and fill the 6 shortcuts with the desired key-combos. The workflow is imported without key combos. It should look like this:
This are the recommended key-combos, the same ones disabled earlier, plus two new ones:- ⌘+⇧+4, to capture an area
- ⌘+⌃+⇧+4, to capture an area to the clipboard
- ⌘+⇧+⌥+4, to capture the last area
- ⌘+⇧+⌥+⌃+4, to capture the last area to the clipboard
- ⌘+⇧+3, to capture the full screen
- ⌘+⌃+⇧+3, to capture the full screen to the clipboard
After configuring the shortcuts it should look like this:
ConfigurationYou can configure the image format, base name, location and drop shadow (in window mode) within the workflow. This procedure is done manually by opening the workflow folder and editing the config.yml file, the options are self explanatory, but please save a backup of the file before changing it.
In the future I'll implement the configuration within the workflow.Source Code
Clone or Fork the Workflow: https://github.com/ramiroaraujo/alfred-screencapture-enhancer-workflow
Changelog- 2014-02-22 - Released
-
ok, looks corrected, please let me know https://github.com/ramiroaraujo/alfred-transmit-workflow
cheers
-
wooops, I've missed your previous comment. I don't usually use FTP accounts without username

I'll check it
cheers
-
@Colorful Tones, well actually it does use ImageAlpha also, check the description!
It uses ImageOptim, ImageAlpha (for pngs) and JPEGmini (for jpegs). The workflow is a wrapper around a command line library (https://github.com/JamieMason/ImageOptim-CLI) that uses all this software in combination.
-
-
Great!
links corrected, thanks!
-
@Cicilia, corrected it. Let me know if ok
-
@Cicilia, damn it! ok, but tell me one thing, given your screenshot, a list of FTPs is populated, right? then when do that error happen?
on the other hand, looks like a text encoding error, I'll check myself and with the favorites file you sent me.
edit:
definitely text encoding issue, my bad, specially since I'm a spanish speaker
I'll fix it asapcheers
-
Text Tokenizer Workflow for Alfred app
Workflow for tokenizing different text value input, and converting them back to a string with multiple syntaxes. It was basically thought as a text exapander to convert space separated works into quoted comma separated values, to use in different languages, mostly because of envy of Ruby's array notation %w().
Usage
Type the keyword tokenizer, followed by a space and then a list of space, comma, semicolon, tab or newline separated values. You can also paste from the clipboard here, which is the only way of inserting tabs or newlines. As long as the input string is not tokenizable, you'll see: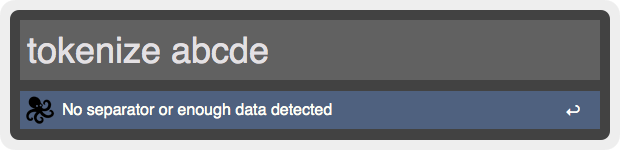
When the input string is tokenizable you'll be prompted with different output options for your data: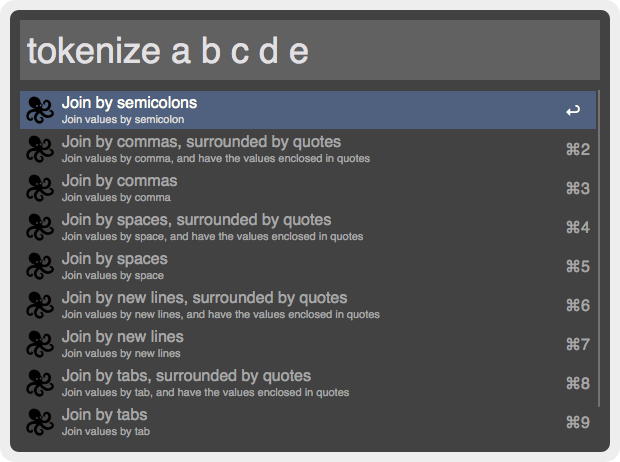
Select any output format and the generated text will be copied to the clipboard and pasted in the front most app.
Installation
For OS X 10.9 Mavericks, Download the alfred-text-tokenizer.alfredworkflow and import to Alfred 2.
For Previous OS X Versions, Download the alfred-text-tokenizer.alfredworkflow and import to Alfred 2.
Source Code
Clone or Fork the Workflow: alfred-text-tokenizer-workflow.alfredworkflow
Changelog- 2014-01-29 - Released
-
@everyone
I rebuilt the workflow with a different XML parser, quite simpler actually. I've tested it in Mavericks only, but with both Ruby 2.0.0 and Ruby 1.8.7 (1.8.7 used in previous OS X versions), and in Transmit 4.4.5 and Transmit 4.4, which use XML and SQLite respectively. I Hope everything should work now.
cheers
-
updated the workflow to support folders, optimizing contained jpegs and pngs recursively.
-
@Cicilia: OS version? Transmit version? Sure you downloaded the correct OS version? Describe "does not work", as in: no feedback at all? or feedback appears but does not trigger the Transmit app? Etc. Any chance you send me your Favorites.xml, maybe a part of it and with host, user, etc modified?
-
I updated the workflow to work with both the XML and SQLite Favorites data source. I hope it works with all Transmit 4 versions now. Feedback welcome
-
Transmit is syncing via dropbox and the sql and xml files are in the same directory, but the sql file hasn't been updated since November, but I just deleted a favourite so it updated the xml file.
Well, after deleting all my Transmit prefs and updating to last Transmit 4.4.5 I can see there's a Favorites/Favorites.xml file and no Favoriltes.sqlite file, at least in a plain base install. I'm not sure right now under what circumstances the sqlite file is created/used. I'll check it
-
Strange, can you try downloading the Applescript examples from Panic's support? Then run the "Basic Connection and File Transfer.scpt" script, and let me know if it tries to connect. If you can, update the script to connect to one of your favorites
-
It’s working for me, but it’d be great if it could search domains as well as titles. Not sure if that’s doable using the SQLite database, but if it is doable that’d make it that little bit more awesome.
makes sense, It now searches in both favorite name and host name
-
@rodgerww, thansks! corrected

Alfred not revealing in Finder after disabling PathFinder
in Discussion & Help
Posted · Edited by Ramiro Araujo
I had restarted the mac actually, but kept trying to open PathFinder even though other apps did not. What puzzled me is that other apps that evidently use the same "open default finder" logic responded to the finder change immediately.
I assumed it was something cached within Alfred files, that's why I tried the cleanup and reinstall.