


Vookimedlo
-
Posts
17 -
Joined
-
Last visited
-
Days Won
3
Content Type
Blogs
Gallery
Downloads
Events
Profiles
Forums
Articles
Media Demo
Posts posted by Vookimedlo
-
-
-
On 10/8/2018 at 1:24 AM, shmulvad said:
I really wanted the feature I describe above, so I went ahead and modified the code to achieve this behaviour. I don't have any experience with Perl, so I guess the stuff I have rewritten is pretty poorly written code, but for now it works. This is what is now shown when the workflow is called with an expression that can be evaluated:

And this is what it looks like when you insert an expression that can't be evaluated:

I have forked the original repo and made a pull request. For now, the modified workflow can be downloaded from here,
Merged back to trunk. New release is available.
The original post above was updated with the current readme.
Thanks!
-
On 7/23/2018 at 11:16 PM, deanishe said:
@snej is absolutely right. It costs nothing to store something in RAM, so modern operating systems just leave stuff that isn't currently in use in there unless they need the space. That way, when you run an app or load a library, if it's still sitting in RAM it will load far, far faster.
You would expect your RAM to be full most of the time once the machine has been running for a while. Empty RAM is wasted RAM.
It's more likely that you just don't have enough RAM to run High Sierra (4GB absolute minimum, I'd say, and you can't go crazy on apps) and/or your OS is paging heavily. Have you tried watching memory usage in Activity Monitor to see what's using all your RAM?
Yep. All modern systems utilise available memory to speed up operations, which are naturally slow (like disk I/O). Kernel memory management is responsible for releasing such cached data when memory is really needed by another process/app.
For example, see this: https://www.linuxatemyram.com/.
-
Dear Alfred users,
Here is a file content analysis workflow I created. I hope you find it useful.
Github: https://github.com/vookimedlo/alfred-file
alfred-file
Alfred 3 workflow for analyzing a file content.
Installation
- Install alfred-file workflow.
- All further updates are handled automatically.
Usage
Select a file or multiple files in finder and invoke the alfred file actions, by default the ⌃⌘\ shortcut.

Then, the brief content analysis for each file will be shown.

-
I would say yes.
From terminal, I would for example call something like this: echo "networksetup -setairportpower en0 off\n" | at +10minutes
Turning this into a workflow should be pretty straightforward. Just consider a better approach, than 'at' command.
-
New version was released. Beside the well known Dropbox, a popular sharing service transfer.sh could be now used for sharing a screenshot.
Original post above was updated with the new description.
-
New version was released. It allows to configure the default folder for local screenshots by setting the
DefaultLocalScreenshotFolder.Original post above was updated with the new description.
-
If you need just a simple screenshot workflow working with the current Dropbox sharing scheme, you could try workflow below, until your favourite 'Screenshot' workflow is fixed again.
-
Hi there!
Here is another workflow merely for fun. It's based on a MacOS built-in voice synthesizer. See more details below and have a fun!
GitHub: https://github.com/vookimedlo/alfred-say-you-say-me
alfred-say-you-say-me
Alfred 3 workflow for saying a given text or a file content with a selected voice.
Installation
- Install alfred-say-you-say-me workflow.
- All further updates are handled automatically.
Usage
Select a UTF-8 encoded text file in finder and invoke the alfred file actions ⌃⌘\.

Choose the
Say...in a displayed menu and select appropriate voice.Then, the resulting file will appear in your
Desktopdirectory.Alternatively, you can pass the text you want to hear to this workflow. In Alfred, type
sayand pass the text as an argument.
Then, select a voice and your text will be spoken. Voices are sorted by their locales and previously selected voices are prioritized. Notice, that each voice in a menu contains its locale, name and a localized voice introduction.

If you press ⌘ during a voice selection, spoken text will be saved in a file stored in your
Desktopdirectory.Have too many voices for a selection is pretty useless, so you can configure the language filter in a workflow configuration. Fill all required locales in
language_filtervariable. Filter is case insensitive and is a regular expression. If you don't know what the regular expression is, just put there all locales divided by the pipe symbol|. See the screenshot below.
Then, you will see just voices which your languages support.

There is another variable you could set. It's a
buggy_voices_filtervariable, which contains a list of buggy voices. Currently, there is a problem in the Apple Synthetization Daemon and some voices can stick it. At the moment, only theen_us - Alexvoice is added there. Again, list is a regular expression.Stuck daemon could be unstuck by typing
.say-unstickin Alfred.
-
Dear Alfred users,
Here is a file action workflow for Alfred. It creates an AppIcon (ICNS file) which is based upon a selected input image.
Github: https://github.com/vookimedlo/alfred-make-appicon
alfred-make-appicon
Alfred 3 workflow for making an app icon [icns] based upon the selected file.
Installation
- Install alfred-make-appicon workflow.
- All further updates are handled automatically.
Usage
In finder, select an image file, which is at least 1024x1024px large, and invoke the alfred file actions, by default the ⌃⌘\ shortcut.
The new
icnsfile will be created in the same location as the original input file.
-
Dear Alfred users,
This workflow is mainly useful for developers, which needs to evaluate bitwise expressions. I hope you will find it useful.
Github: https://github.com/vookimedlo/alfred-bitwise-evaluator
alfred-bitwise-evaluator
Alfred 3 workflow for evaluating bitwise expressions.
Installation
- Install alfred-bitwise-evaluator workflow.
- All further updates are handled automatically.
Usage
In Alfred, type
bitwiseand enter your bitwise expression which shall be evaluated.
Selected result is copied to your clipboard.

Expression is being evaluated as you type the expression. If expression cannot be evaluated, either for illegal characters or syntax error, user will be notified about that.

Bitwise expression syntax and operators precedence
Workflow is based on Perl, therefore it uses its syntax and operators precedence, which is easy to use. The golden rule in programming languages is the following: "If you are unsure about the operator precedence, always use parentheses to be sure what you are doing.". It's not a shame!
OPERATOR NAME SYNTAX Bitwise NOT ~a Bitwise AND a & b Bitwise OR a Bitwise XOR a ^ b Bitwise left shift a << b Bitwise right shift a >> b Integer formats
The four formats listed below are printed.
INTEGER FORMAT SYNTAX EXAMPLE Decimal 1234 Binary 0b1110011 Hexadecimal 0x1234 Octal 01234 Workflow Keyword
The default workflow keyword
bitwisecould be changed in alfred workflow settings. This variable will not be overwritten once the new workflow update is installed.
Note
Before the expression is evaluated, input data will be checked for illegal characters. If those are found, evaluation will not continue. This is done for making the workflow harmless. If you remove this check, you could evaluate any Perl code, which could be pretty dangerous. Do that only if you know what you are doing!!!
-
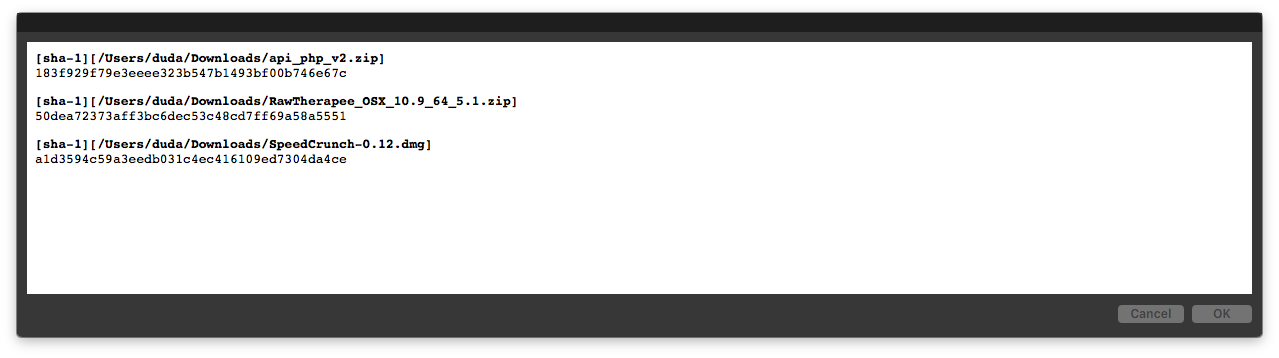
Dear Alfred users,
Here is another file digest computation workflow for Alfred. It's aimed on files only, so data are read in binary mode.
The most useful digest are "md5" and "sha-1/256/512" in these days,
Github: https://github.com/vookimedlo/alfred-file-checksums
alfred-file-checksums
Alfred 3 workflow for computing file checksums.
Installation
- Install alfred-file-checksums workflow.
- All further updates are handled automatically.
Usage
Select a file or multiple files in finder and invoke the alfred file actions, by default the ⌃⌘\ shortcut.

Choose the appropriate digest algorithm in displayed menu. Be aware, that a digest computation takes its time on large files, so be patient! By default, computed digests will be shown. This could be overridden by pressing the ⌘ key, which forces to put computed digests to clipboard.

Then, by default, the computed digests from selected files will be shown.

-
Dear Alfred users,
Here is another screenshots workflow for Alfred. I created it while I has learnt how to write an Alfred workflow. Maybe you find it useful.
Github: https://github.com/vookimedlo/alfred-various-screenshots
Github - released package: https://github.com/vookimedlo/alfred-various-screenshots/releases/latest
alfred-various-screenshots
Alfred 3 workflow for taking various screenshots.
Currently supported storages are the following.
- Local drive
- Clipboard
- Dropbox service with an ability to share a link to the uploaded screenshot.
- Transfer.sh service with an ability to share a link to the uploaded screenshot.
- 0x0.st service with an ability to share a link to the uploaded screenshot.
- File.io service with an ability to share a link to the uploaded screenshot. After uploaded image is downloaded, the file is completely deleted!!!
Installation
- Install alfred-various-screenshots workflow.
- All further updates are handled automatically.
Usage
In Alfred, type
ss, which stands for ScreenShot and initiates a submenu which offers three options.- Screenshot - Area
- Screenshot - Screen
- Screenshot - Window


By default, the screenshot is stored in a file located at your
~/Desktopdirectory. This could be overridden, either by pressing the ⌘ key, ⌥ key, ⌃ key, ⇧ key, or Fn key.- ⌘ - instructs the workflow to put a screenshot to the clipboard.
- ⌥ - shares a screenshot via Dropbox and stores a sharing link to the clipboard.
- ⌃ - shares a screenshot via Transfer.sh and stores a sharing link to the clipboard.
- ⇧ - shares a screenshot via File.io and stores a sharing link to the clipboard.
- Fn - shares a screenshot via 0x0.st and stores a sharing link to the clipboard.
Screenshot files will be named according to the following pattern
screenshot_%Y-%m-%d_%H-%M-%S.pngY Year in full form (e.g., 2006). m Numeric month, a number from 1 to 12. d Day, a number from 1 to 31. H Hour, a number from 0 to 23. M Minutes, a number from 0 to 59. S Seconds, a number from 0 to 59.Default local screenshot folder
~/Desktopcan be changed by the workflowDefaultLocalScreenshotFoldervariable.
Dropbox
There is no need to install a Dropbox software to your MacOS. The only requirement is to log into the web Dropbox account and create an access token for the workflow.


Such generated access token shall be placed to the workflow
DropboxAccessTokenvariable.
-
I have rewritten it from scratch. This is my first Alfred 3 workflow, so I use it to investigate what is possible in the amazing Alfred.
alfred-ffprobe
Alfred 3 workflow to display an information about various video files.
Installation
-
Install the ffprobe to your MacOS.
- You could do it for example by using Homebrew and installing ffmpeg package.
-
brew install ffmpeg
-
Install alfred-ffprobe wokflow.
-
All further updates are handled automatically.
Usage
Select a video file or more video files in finder and invoke the alfred file actions ⌃⌘\.

Choose the
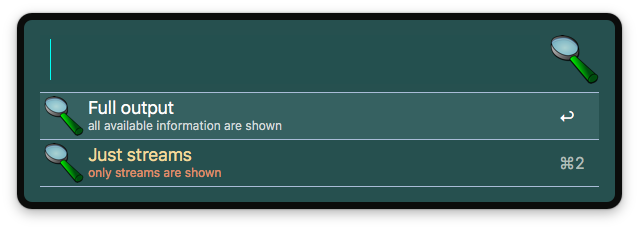
Analyze media file...in displayed menu and select appropriate action.
Then, the information about selected videos will be shown. The full ffprobe output could be retrieved by selecting the option
Full output.
From time to time, full results could be annoying, so there is another option just showing the results describing inner streams. Just select the option
Just streams. Output is much more well-arranged.
-
-
My first Alfred theme, based on my favourite Emacs subtle-hacker style.
Link to alfredapp: https://www.alfredapp.com/extras/theme/EGSdM3EeI8/
Link to GitHub: https://github.com/vookimedlo/alfred-subtle-hacker-theme
----------------------------------------
Alfred Subtle-Hacker Theme
Alfred Subtle-Hacker Theme is based on the Emacs subtle-hacker theme.
Download and double click on
Alfred Subtle-Hacker.alfredappearance. The theme will automatically be imported for you.

-
Hello Alfred users,
I created a new Alfred workflow, or better said file action, called alfred-ffprobe. It displays information about selected video files.
alfred-ffprobe
Alfred 3 workflow to display an information about various video files.
Installation
-
Install the ffprobe to you MacOS.
- You could do it for example by using Homebrew and installing ffmpeg package.
-
brew install ffmpeg
-
Install alfred-ffprobe wokflow.
Usage
Select a video file in finder and invoke the alfred file actions ⌃⌘\.
Choose the
Analyze media filein displayed menu and the information about selected video will be shown.
- cands, Diegobit and joeynotjoe
-
 2
2
-
 1
1
-


Bluetooth Toggle
in Share your Workflows
Posted
Or this one: https://github.com/vookimedlo/alfred-adapters